

WEBSITE:
www.winecountry.camera
COST:
$449 USD (with polarizer*) or $299 USD (without polarizer)
(INCLUDES: 100X100 ND Vault, 100X150 Grad Vault, Adapter Ring, Polarizer*, Case for holder, Case for Vaults and Adapter Ring)
THE WHY:
Long Exposure photographers using ultra-dark Neutral Density (ND) filters have simple, but highly demanding needs. We need a light tight system that is easy to use, easy to change from one filter to the next, and FAST. Our preferences are for it to be lightweight and slim if possible; I mean, doesn’t everyone want that? But I think we can all agree that many times in photography it is simply not possible to have those last two elements when ultra high quality gear is in the conversation. Some flexibility here is understood.
THE STATEMENT:
We don’t REALLY need another filter holder system to choose from, do we? I mean, there are plenty out there at this point; they are ALL proven to do the job, minus a few headaches perhaps, but they all work. So why then should we even consider spending $450 USD for another filter holder, you might ask? Well, I suggest you read on!
Holder, Adapter Ring, Polarizer, ND Vault, Grad Vault, & Cases (tripod not included)
THE OVERVIEW:
There is a new kid on the block, and those that aren’t paying attention are likely to get blindsided. The filter holder system being offered up directly from Wine Country Camera first began shipping on December 22, 2016 and is now available at other typical locations such as B&H, Adorama, and Amazon all at the fixed pricing listed above. The weight is just less than 16 ounces, but what will surprise you the most is its size; we will get into the whys of this in a moment. It comes with an integrated polarizer (optional) and the ability to use graduated ND filters. It is the part about the graduated ND filters that is one of the most intriguing. This has been the hang-up for so many years now with us long exposure photographers. There simply was not an easy way to adjust the grad to its desired location and then slip the one, or even two, ND filters behind it and keep the grad’s horizon where you intended, especially if it were to be at an angle. This system solves that problem. Having the addition of a polarizer is wonderful as well, but many of us were able to work around that by just putting the polarizer on first and then the adapter ring on top of that; then we just had to be careful not to turn it when we attached the filter holder to the ring.
ND Vault shown with filter inserted. Notice the orientation of the locking "coin".
Well, the good folks at Wine Country Camera decided it was high time to make a holder that simplifies the process. Basically, rather than taking the holder on and off between shots, their theory was why does it have to come off the camera in the first place? I tend to agree with that train of thought. The ND “Vault” (so called because it’s the frame that holds the filter) slides into place while the holder is already on the camera. This is brilliant! How has this design not been thought of before now, I ask! Anyone? Anyone? Yeah, that’s what I thought. They have found a way to reinvent the wheel, and I commend them for that.
In other words, your camera gets mounted to the tripod, then the adapter ring goes onto the lens, and the holder slips onto that (quite easily, I might add). The holder then locks into place with a “pressure pin”, for lack of a better word. This pin would ordinarily bother me, since it’s a screw type pin, but since it’s not coming on and off between shots, I don’t mind having a setscrew type of locking system; I thought I would, but it is simply a non-issue. Once on, the polarizer can be adjusted, the graduated filter can be put into place (if desired) and the ND Vault (with filter) can just be dropped right in. Once the long exposure shot is complete, the ND Vault just pulls right out and you are ready to compose your next shot. It’s that simple; NO REMOVING THE HOLDER FROM THE LENS! How do you like that? It suits me just perfect!


THE MATERIALS:
Aside from the obvious excellent machining of the holder itself, there are other details that fly under the radar. The clutch plates that hold the Vaults are made of pure Teflon to ensure smooth operation… and believe me, they are as smooth as it gets. The gears that operate the polarizer are made of ultra-high molecular weight polyethylene, also for smooth operation and extremely long wear. Finally, the polarizer itself is made of thick, fire polished Schott glass with 8+8 multi-coatings on both sides. This is one serious polarizer and every bit justifies the $150 price tag. Rather than an after thought to include it, it has been part of the overall design from the very beginning, and you can tell. This polarizer is every bit as good as the top dogs out there, and I would not recommend getting this system without it. The best part is that it also is easily removed if desired.
Polarizer gears and locking lever to secure polarizer in the holder
Clutch Plates
Detail view of back side of polarizer
THE TAKE:
To be honest, I was a bit concerned at first with the overall size of this thing. I mean, lets face it… it’s big! But it’s not as big as I had originally thought, and the size is quite justified with the functionality. I’m here to tell you that this is one lovely piece of equipment to work with! Yes, it’s also heavier than your other holder; but again, this is justified by the functionality, the addition of the polarizer, and the ease of use. Quite frankly, I’m not sure how we’ve been living without this thing for so long. OH, that’s right… it has only just now become available! We’ve been driving on oval wheels up until now; you can move on them, but just not ideally. It feels really smooth to finally move on round wheels once again!
Comparison to standard holder & ring
Standard holder INSIDE of WCC holder
Comparison to standard adapter ring
Vaults with locking coins in open position
Sure, there are a few little tweaks that could be made (which we’ll discuss below), but overall this product has changed the game in filter holder design. I love being able to put a filter in the Vault and never have to touch the glass again. Think about this for a moment… if all your filters lived in these Vaults (which weigh nothing), then you just grab them by the tab and be done with having to constantly wipe fingerprints away. At this point the Vault is a dream to work with in how it just slides smoothly into the holder with nary a hiccup. The filters are held into place in the Vault with the little wine coin that rotates very easily to remove the filter if and when needed. And the best part, no more gaskets needed on your glass when using this set-up.
The wood accents are actually a functional part of the system in that wood simply does not get hot or cold to the touch. These are handles, of sorts, and the wood is a brilliant idea for this application. Not to mention, it really looks quite nice in my opinion; and wood weighs next to nothing, so why not?
Locking buttons for Grad Vaults
The graduated filter Vaults are held steady by the little red buttons on the front. It takes a bit of time to get use to which button controls which slot, but with time that will become second nature I’m guessing. Basically, you will press the button, adjust the grad up or down, and then release the button to lock it into place.
Regarding the polarizer, I really like how easily it rotates via the wheel at the bottom. A lot of thought was put into how the gears would be designed to stay as small as possible, but run smoothly at the same time. Furthermore, the polarizer rotates in the same direction as the main gear… brilliant! Again, why have we been waiting so long for such a thing?!?!
THE CONCERNS:
These are not really bad things, per se, but things that you will need to be aware of…
Non-locking ND Slot:
The ND Vault does NOT lock into place, so if the camera (and tripod) is put over your shoulder when moving from one location to the next, and your lens ends up oriented the wrong way, that ND Vault will come crashing to the ground in a shattering disaster. BY THE WAY, this is NOT A RECOMMENDED method of moving from one place to the next, but if you must, just take it out before you move! It’s not a big deal, as it pulls out so darn quickly, but it is indeed something to remember. This is kind of a 50/50 decision here as having a locking tab (of sorts) could potentially cause difficulty removing the Vault, thus defeating the purpose of the design; so the good folks at Wine Country Camera decided to go without a locking tab. That being said, I wouldn’t mind seeing some possible tweaks to this on the next generation; but for now I'll just remember to always take it out prior to putting my tripod over my shoulder. I mean, it has to come out to recompose my next shot wherever I am moving to anyway, right? So why not just take it out ahead of time... simple as that.
Attachment to Adapter Ring:
The holder slides on and off of the adapter ring very smoothly, which is a wonderful testament to the high quality of machining. However, if your camera is pointed down and you loosen the setscrew, make sure you are holding it well so that it doesn’t slip right off the ring, again, to a crashing disaster. This is different than some other holders that have a tooth and groove design and are more secure. BUT, just lock the setscrew tight and be on your way. Remember, this holder does NOT come off between shots, so this should be a non-issue!
Adapter Ring Diameter:
The adapter ring is quite wide and you’ll either need to make adjustments to your camera bag, or it will need to come off the lens prior to putting the camera back in the bag. This could be a headache if you like to put your camera in your bag quickly every time you relocate a few hundred yards or so. I go against the recommended method of relocating and will normally just carry my camera and tripod over my shoulder; so again, this is a non-issue. However, this is where it will be highly important to remember to remove the ND Vault from the holder so you don’t have a crashing mess of shattered glass and a broken wallet. That being said, I am highly rethinking carrying my camera and tripod over my shoulder, even for short distances. It's simply a risky endeavor. SO... it would appear that I will be adjusting my camera bag to accommodate the lens with the ring mounted, somehow.
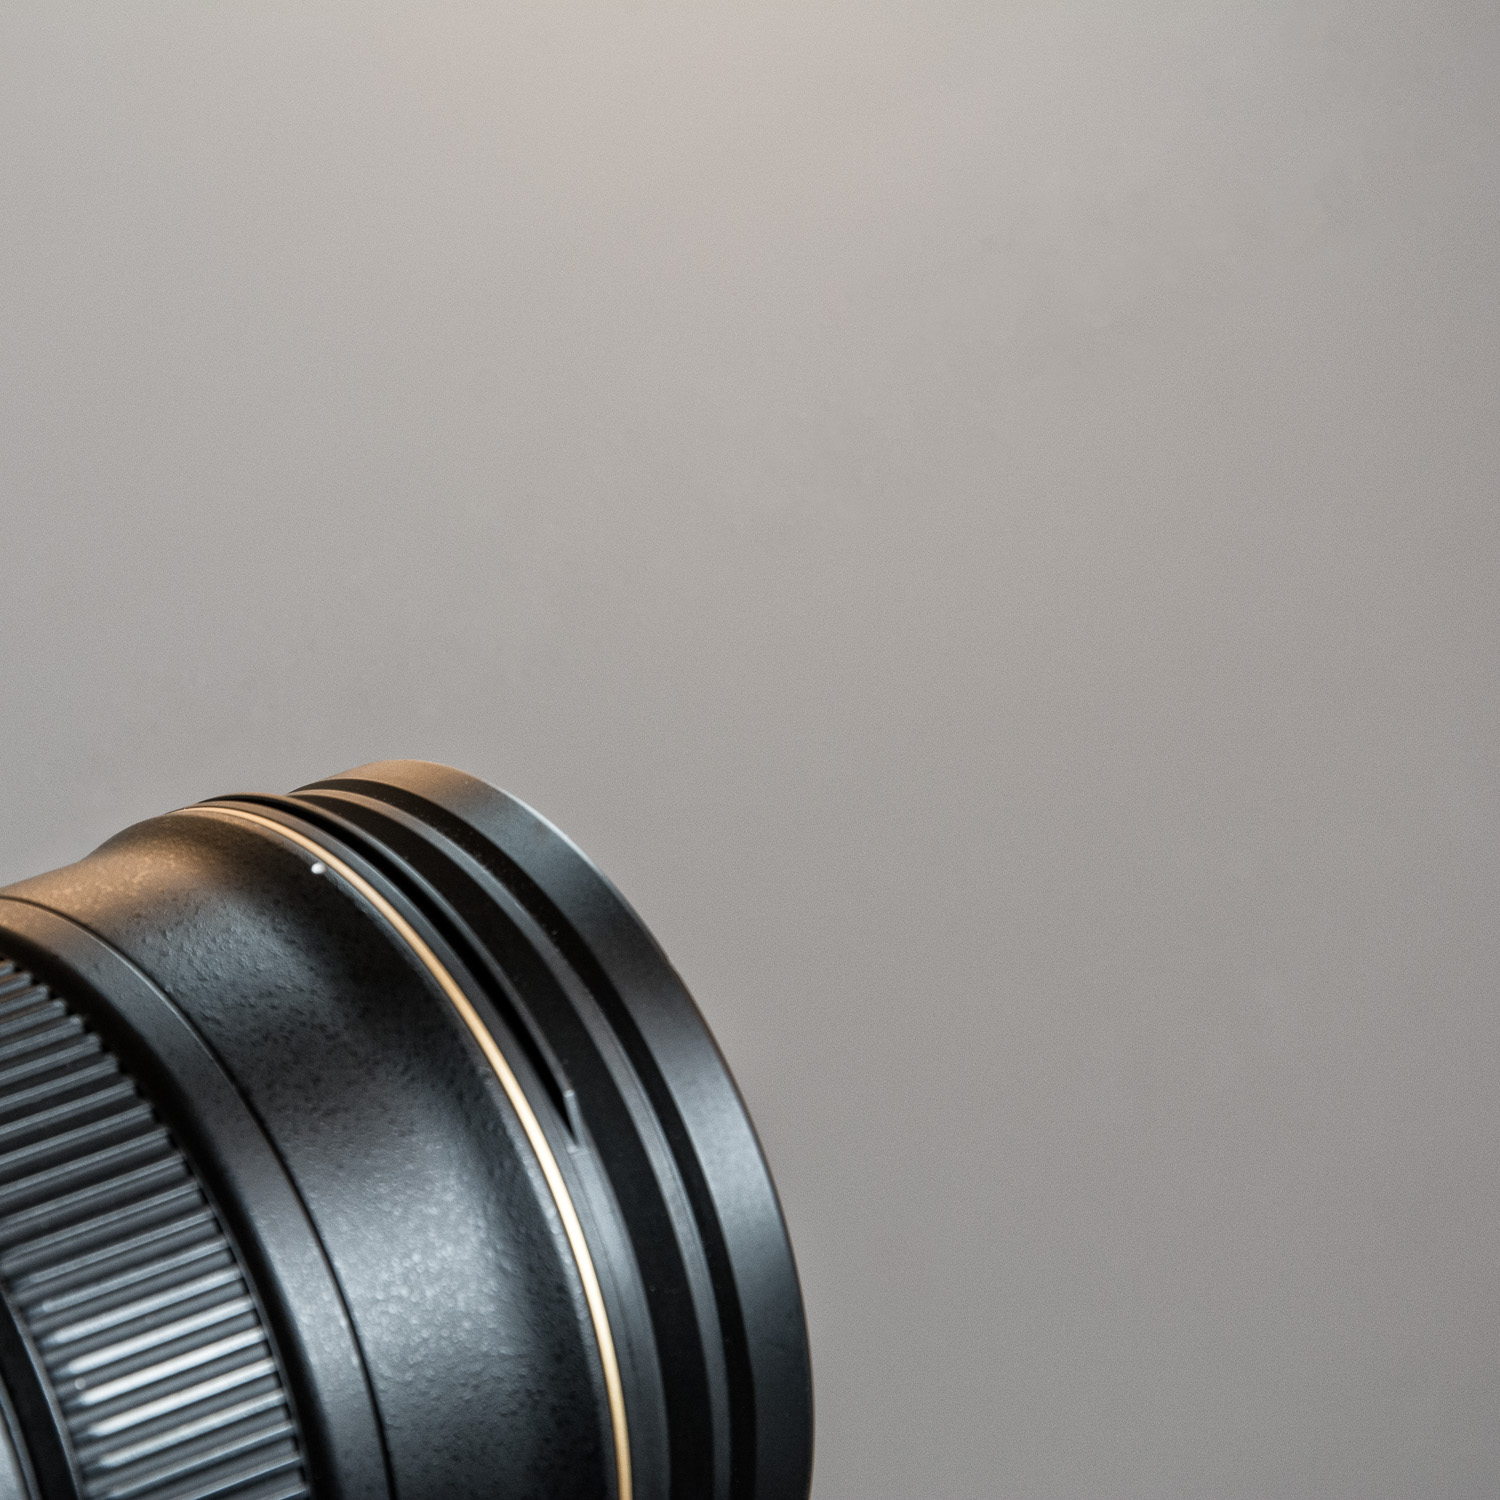
Potential light-leak area at the top between the vault and housing.
Light Tight:
The ND Vault is designed to be used without gaskets… this is GREAT! However, while it is said to be light tight, there is a tiny bit of play between the Vault and housing where light could potentially leak. I can see it upon very close examination but have not experienced any light leak in the field as of yet. I believe this will also be a non-issue, as the system is said to be light tight; I have not had an issue as of this writing, and no reason to believe otherwise. However, I will be keeping my eye on this, as it could potentially be a problem that simply will not be tolerated in most workflows for LE Photographers.
Carrying Pouch:
I would love to see a “filter pouch” offered in the future that would be wide enough to hold all my filters, IN THEIR VAULTS, on my waist. Simply put, the pouch that comes with the kit is not a waist pouch, nor is it large enough to hold a full collection of filters. I have been using another pouch for quite some time now, but it’s not quite wide enough to hold the Vaults. I can get one Vault in the very front slot of my current pouch, and that’s it. This is doing just fine for now, but when I eventually buy Vaults for every one of my filters, I will need another carrying system. For now, I am just swapping the filters out of the one ND Vault as needed. Again, it is so much easier to swap filters in the Vault than it has ever been to swap them in the traditional holders. Bottom line, I’m getting by just fine with my current carrying set-up.
UPDATE: I am now using the MindShift Filter Hive Storage Case, and it's working out perfectly! It holds all of my filters in their vaults, plus cleaning cloths, and even a few extra things that I like to have handy. It's a very worthy addition to my workflow!
Stacking:
For those of you that stack a 6 & 10-stop to achieve your desired 16-stops, this is something you should consider revising in your workflow to begin with. It is much more reliable to simply have a single filter of a given density. That being said, this holder can accept stacked filters, but because of the intended design there will be quite the gap between the two. So, you’ll have to resort to a variety of methods to stop the light leak between the filters, thus defeating the entire purpose. My recommendation is to move away from stacking whatsoever. If you have a 6 & 10-stop filter, great… keep those and just add a 13 & 16-stop and you’ll be golden. Here again, this should be a non-issue if using this holder in its intended fashion.
Wrap-up of Concerns:
I realize that the list of “concerns” seems big, but just remember that when something has pushed the envelope so far as this has, there are bound to be a few learning curves for both designer and end user. I feel that the design is amazing and very little needs to change. It is up to us as end users to adjust our workflow; these aforementioned concerns are really only workflow related things after all.
Complete set with cases
THE CONCLUSION:
The Wine Country Camera filter holder system is hands-down the best design I’ve encountered. Sure, it’s heaver; sure, it’s bulkier; sure, it’s more expensive...
...IT’S DIFFERENT!
...IT'S JUSTIFIED!
At the end of the day, it’s not going to destroy the room in your bag, nor is the 15 ounces going to break your back. The advantages of this system far outweigh the few disadvantages. Heck, I don’t really even want to call them “disadvantages” because they really aren’t that, but more just “learning curves”.
For those that are as serious about long exposure photography as I am, this holder system is one that needs to be highly considered. For the non-LE photographer, this is also a fantastic system for your polarizer and graduated ND’s to all be housed in one set-up! Basically, this is pretty much great for most serious shooters.
I seriously can’t think of anything that will keep me from using this new holder system in my normal workflow; but I can think of a bunch of reasons as to why I WILL USE IT!
PLEASE LEAVE ANY COMMENTS BELOW. I WOULD LOVE TO HEAR WHAT YOU THINK.
Cheers!
- Kevin